VPN on pfSense with Killswitch
A VPN is a great solution for privacy, and at times, a great solution for security too. Many people run VPN’s using software installed on their PCs. This is absolutely better than nothing, but can still give room for error if the connection disconnects and the software contains no killswitch, or, the software’s killswitch doesn’t work as designed.
Additionally, you may accidentally forget to turn your VPN on, or, if your PC is booting up, you may inadvertently leak personal information before the VPN has connected. The solution to this is a VPN at the network level — this way, it is device-agnostic, and always on.
I utilise pfSense for this, and NordVPN as my provider. This guide will cover such a setup — however, the same overall process will work with any VPN provider (it will just require some tweaks to work with your provider).
The Process⌗
Set up Static IP mappings⌗
For every machine you will have connecting through the VPN, you’ll want to create a static address mapping in DHCP. This will ensure that the firewall rules you will create (which will apply to IP addresses) will remain effective due to the consistency of the addresses assigned.
I’m assuming you’re fairly familiar with the pfSense interface, but if not, go to Services > DHCP Server > DHCP Static Mappings and click the Add button. You’ll just need the MAC address, and an IP outside your DHCP scope.
Create a Firewall Alias Group⌗
To make rule creation simpler, we’ll create a firewall alias, and use that for all the rules. Then, later on, adding a new device to the VPN is as simple as adding it into the firewall alias. To accomplish this, go Firewall > Aliases, then click Add and give it a name. In my example, I’ve named it VPNClientsDoubleVPN so it’s easy for me to distinguish later. Make sure to click Save when you’re done.
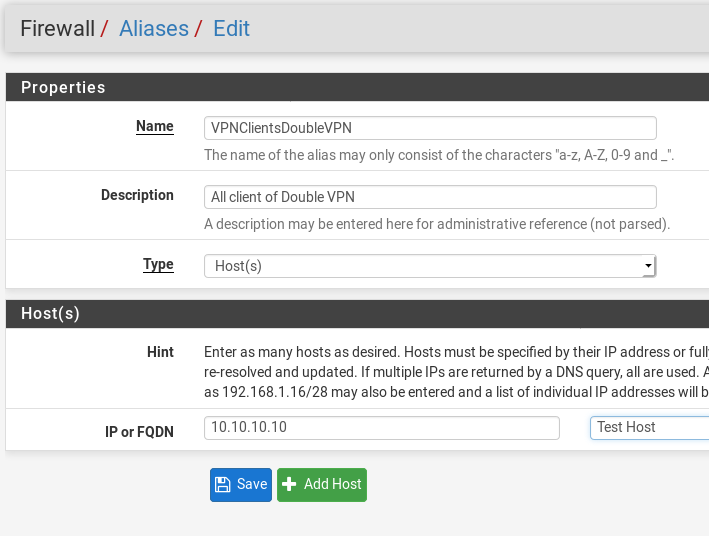
If you have IPv6 enabled on your network, be mindful of needing to add those addresses too (otherwise you may have some leakage).
Import the CA Cert⌗
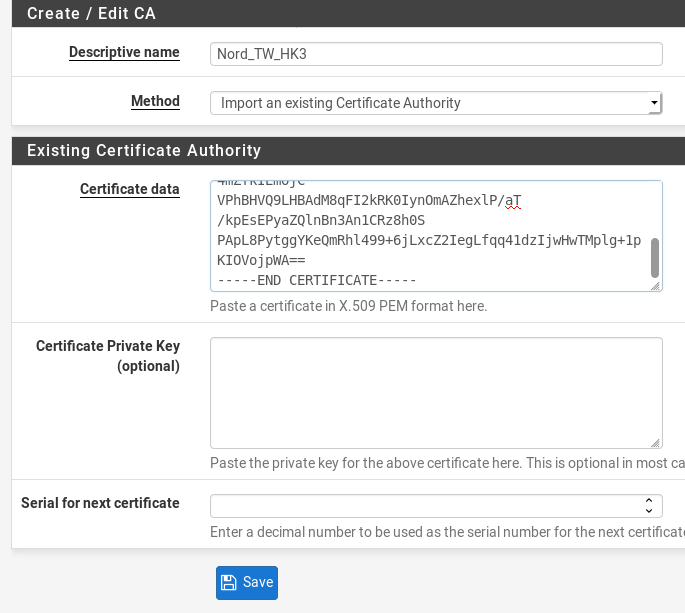
Go to the NordVPN Tools Page and pick a server that relates to you. I’m picking one of the DoubleVPN servers in this part. Download the OpenVPN config — generally you’d pick the UDP one. In that file, there’s a certificate — it’ll start at —–BEGIN CERTIFICATE—- and go through to —-END CERTIFICATE—- - copy this, including those lines.
https://nordvpn.com/servers/tools/
Then, go to System > Certificate Manager > CA’s > Add. Give it a descriptive name like Nord_TW_HK3. Change the Method to Import an existing Certificate Authority. Then, paste your copied certificate in the Certificate Data field and click Save.
Set up the VPN connection⌗
At this stage, we’ll just set up the connection to the VPN; routes and NAT etc will be done further down.
In pfSense, navigate to VPN > OpenVPN > Clients. The settings you require are below:
Setting Name:
Setting Value⌗Disabled:
UntickedServer Mode:
Peer to Peer (SSL/TLS)Protocol:
UDP on IPv4 Only (in my case, for Double VPN, this will be TCP)Device mode:
tun — Layer 3 tunnel modeInterface:
Your outgoing interface (WAN, for me)Local port:
Can be left blankServer host or address: VPN endpoint —
tw-hk3.nordvpn.comin my caseServer port:
Generally, 1194 if UDP — for me, 443Description: Something that makes sense —
NordVPN_TW-HK3is what I usedUsername:
Your NordVPN userPassword:
Your NordVPN passwordTLS Configuration:
Tick "Use a TLS Key"Automatically generate a TLS key:
Untick thisTLS Key: Copy and paste the
OpenVPN Static Keyfrom the config file you downloaded into this field. You’ll find it toward the end of the config file — copy from the BEGIN line to the END line inclusive.TLS Key Usage Mode:
TLS AuthenticationPeer Certificate Authority: The CA cert we imported earlier —
Nord_TW-HK3Client Certificate:
NoneEncryption Algorithm:
AES-256-GCMEnable NCP:
CheckedNCP Algorithms:
AES-256-GCM and AES-256-CBC (You'll need to click the existing entry to remove it)Auth Digest Algorithm:
SHA512 (512-bit)Hardware Crypto:
Select one if you have a hardware crypto moduleTunnel Compression:
No LZO Compression [Legacy style,comp-lzo no]Topology:
Subnet — One IP address per client in a common subnetDon’t pull routes:
Tick thisCustom options:
See block belowGateway Creation:
IPv4 only
Click save.
tls-client;
remote-random;
tun-mtu 1500;
tun-mtu-extra 32;
mssfix 1450;
persist-key;
persist-tun;
reneg-sec 0;
remote-cert-tls server;
Assign the Interface⌗
Go to Interfaces > Assignments. Under Available Network Ports, click the dropdown and choose your newly created VPN interface, then click Add. Subsequently, click Save.

Once done, you may wish to rename the interface from OPT1 or similar to another better named interface. Just click on the interface name in the list, and change the Description — you’ll also need to tick Enable interface. I also check Block Private Networks and Block Bogon Networks.
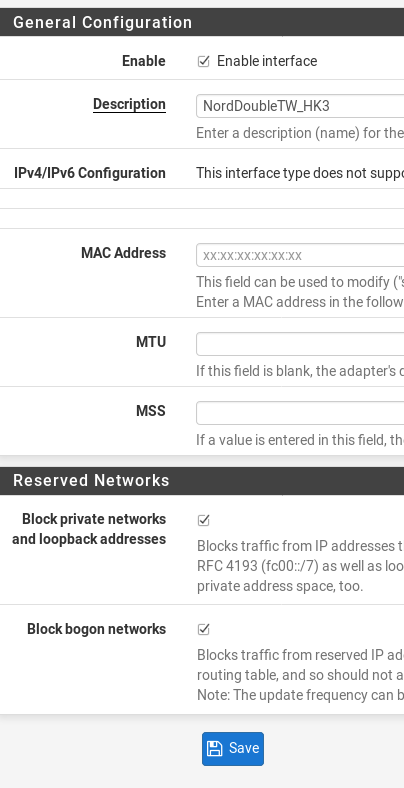
Once saved, click Apply the changes.
Set up NAT⌗
We’ll need to add some NAT rules for our traffic to get through. You may already be doing this manually, or you may have gone the lazy route and just had fully auto. I’ve gone the combo — the “Hybrid” route so that the system subnets have auto-created rules (so that they are auto-added if any new ones get added), but I can still add my manual rules.
Click to add a new rule, then choose the Interface you just made above. Address family should be IPv4, Protocol as Any, Source Network will be the Internal subnet of whatever network you are NAT’ing for — in my case, 10.15.15.0/24, and Destination will be Any. Translation address will be Interface Address. Give it a description and click save.
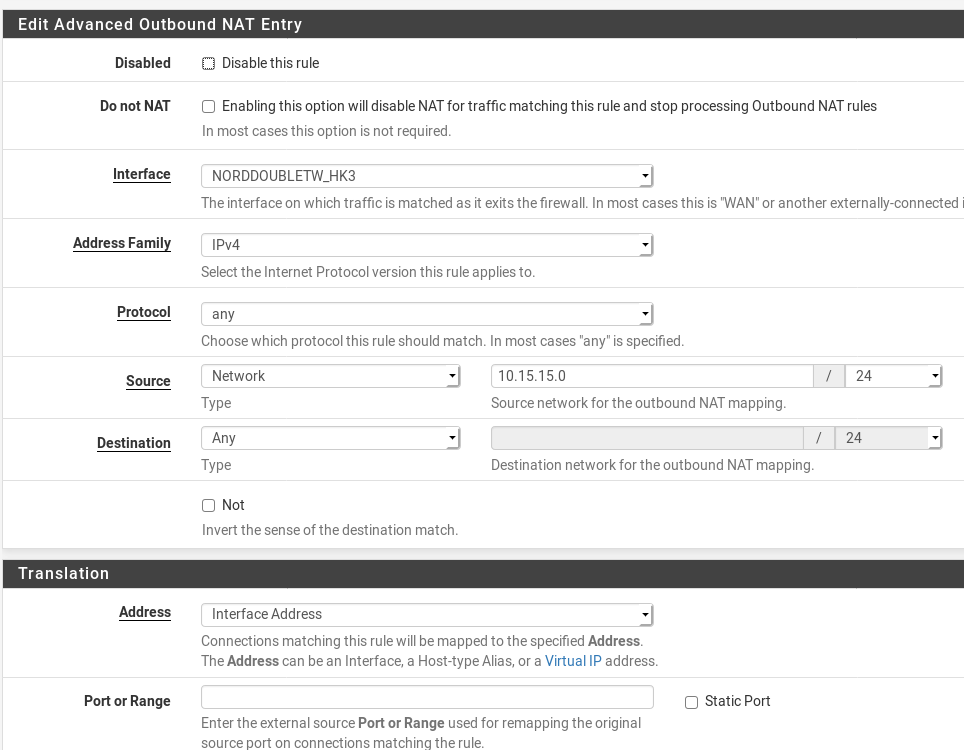
Once saved, click Apply. Create one of these for each of your network ranges you wish to NAT for/use with the VPN.
Set up Firewall Rules⌗
We’ll set up our rules in Firewall > Rules on your LAN interface (I’m presuming you know how to do this if you already have a functioning pfSense). If you don’t use secure + private DNS servers on your pfSense already, you may wish to create a rule which blocks all queries to the LAN DNS server from any client in the VPN Alias group. If you do this, make sure that your DHCP Static Mappings are set to issue your VPN’s DNS server to these clients for direct querying.
You may also wish to block all IPv6 from any client in that alias, if you don’t already drop all IPv6 at the Firewall level (as I currently do). The main rule you’ll want is the one that sends all traffic out the VPN. Add a rule like so:
Setting Name:
Setting Value⌗Action:
PassInterface:
Your LAN InterfaceAddress Family:
IPv4Protocol:
AnySource:
Single host or alias: Enter your Firewall Alias name hereDestination:
Any, or, if you need to access other internal networks, create an alias of all local subnets, and invert the match to that (therefore tunnelling out everything but your local networks)Advanced options:
Show advancedTag:
VPN_NO_WAN_EGRESS(this is the tag we’ll use to make killswitch)Gateway:
Your VPN interface
Then click Save and Apply.
Finally, add a rule to your Floating interface to block any outgoing from IP.
Setting Name:
Setting Value⌗Action:
Block (or Reject)Quick:
TickedInterface:
WAN (or your main outgoing)Direction:
AnyAddress Family:
IPv4+IPv6Protocol:
AnySource:
AnyDestination:
AnyDescription:
Something usefulShow Advanced:
Click itTagged:
VPN_NO_WAN_EGRESS(the tag we made earlier — this is used to match the block rule to this traffic)
Save and Apply. After doing this, I’ve also found I need to Stop then Start the OpenVPN clients. Status > OpenVPN, then click the “Stop” icon and then the “Start” icon next to Client Instance Statistics. You may also want to enable Services > Service Watchdog to auto-bring the service back up if it crashes.
A Note on DNS⌗
Your current DNS configuration possibly (probably) leaks a lot of info about you. You may be using your ISP’s DNS servers, or, you may be using upstream ones. However, even if you use something like Google’s DNS, you’re still at risk. There are particular types of DNS entries which can essentially force your DNS servers to query the website/server directly, in essence exposing your DNS servers IP addresses. In turn, this combined with your exit IP can provide a relatively unique fingerprint (more so when combined with browser fingerprint, which is again, even more unique).
The solution is one of two possibilities:
- If your VPN Provider doesn’t serve DNS internally, then you’ll need to have a DNS server on your LAN (CoreDNS for simple configuration) which is acting as a forwarding server. This can forward to your VPN provider public DNS (preferably) or a random other DNS server, but you can tag the DNS traffic coming from that server and force it through VPN. The pfSense box will then use this internal server as its resolver, all your clients will use pfSense as their DNS server, and by extension, all clients will forward DNS through the VPN.
- If your provider offers private DNS on the OpenVPN interface (as does Mullvad), you simply set up the DNS server in pfSense general setup, and assign no gateway (as its direct connected). Then, in Servers > DNS Resolver, set the “Outgoing Interface” to be your VPN interface. In this way, your pfSense directly queries the VPN providers DNS (this is the setup I’ve used with Mullvad).
Testing⌗
Test your client — check it is accessing via VPN. Then, disable VPN — make sure the client cannot get to the net. Finally, re-enable VPN and make sure you can connect once more. That should be it!